Showing posts with label makeover. Show all posts

Chippendale Chair Redo Reveal

July 30, 2014


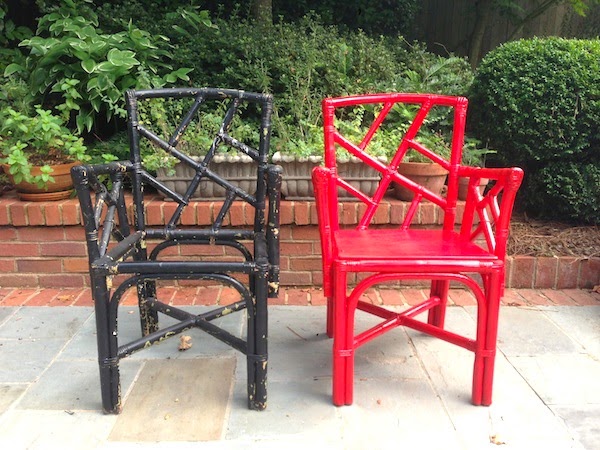
I'm excited to finally reveal the DIY Chippendale chair redo! If you've been following the story you know how long this project has been going on, so you can imagine how excited I am to have the finished product. I first picked these chairs up in November over Thanksgiving when I was visiting from New York. They were probably on my parent's neighbor's curb for less than 5 minutes on their way to the trash yard before I snatched them up and tucked them away in the garage. This gives you some background for the kind of condition the chairs were in. The black paint was chipping revealing multiple other layers of failed paint coats, there were cobwebs and bird droppings all over the chairs, and most obviously to note - they were missing seats. 


First things first, I pressure washed the chairs to remove a lot of the cobwebs, bird droppings and pollen and used a wire brush to pull off the paint. In some places, this revealed the original wicker. 


Once the chairs had dried, I used a white primer to help seal and cover the previous paint coats. From there I used a primer + paint spray paint in red, and applied about two coats letting them dry in-between each.


This is where the long stall came in this project. The next step was to build the seat and a wood cutter was going to be needed. This is where my strategic placement of these chairs in my parent's garage came in handy - leading to my dad to do the wood work. We measured the seats, cut the wood to the measurements, sanded the corners and screwed the seats into the frames.


Another coat of paint (this would be the third one), and we had a pretty drastic before and after shot.
From the start, I had loved the bright apple red paint color and had been planning to pair it with a black Asian inspired print. This changed when I saw this fun pink and red bohemian pillow from Lulu & Georgia. I knew I had to have it. They only had one in stock, so the chairs turned towards statement chairs in different rooms instead of a pair. I put the bohemian print pillow with a standard white cushion that I got on clearance at World Cost Market for $14. The total cost of the chair redo was around $30! With Chippendale chairs retailing for as much as $700, I'd call this diy a success, and one that's easy to replicate. In this case, the structure of the chair is not extremely ornate, so the pop of red color helps make the chair look more chic and glamorous. This style of chair could easily be found at estate sales, garage sales and antique stores and redone to look brand new.


Watch The Process:

Or follow the process here:

What do you think of the finished look?

Hump Day Home Makeover - Ikat Curtains

August 28, 2013

A few years ago I bought these beige ikat curtains from West Elm for my bedroom. They ended up migrating to the living room and are now back in my bedroom in New York. To me this is the testament of a good home decor piece - the ability to mix and match with different styles and settings. For today's Hump Day Home Makeover, I wanted to do something a little bit different than usual and rethink what the living room could be with the same piece. Here are the curtains in the living room from about 3 years ago...


And here's the new look!


Hope you all have been having a great week! This week has been extra special for me because one of my very best friends got engaged yesterday during her trip to Croatia! 

A HUGE Congrats to Steph & Eric on your engagement!! Love you both.

Hump Day Home Makeover / Durable Living Room

August 14, 2013

I have never thought about buying a leather couch, let alone buying a black couch. Growing up in a southern home, couches were patterned, and I envied the pristine white couches in decor magazines. White fabric looks amazing and chic in home decor, but I am definitely a spiller. I can hardly get through a full day wearing a white shirt without searching for a Tide pen. So for today's Hump Day Home Makeover, I challenged myself to pull together a room around a black leather couch that I would want in my own home. Here's what I came up with.

10. Lack Coffee Table - IKEA

I can't take full credit for the room as I did some inspiration searching. Aren't these rooms awesome?? Black couches = win, win.
Chic and durable!
source


hump day home makeover / a room to think in

August 07, 2013

source
And my craze for a trip out West continues...
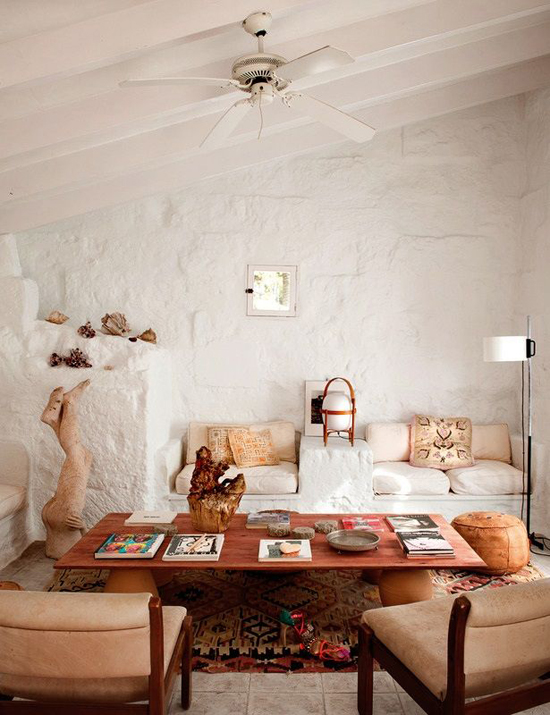
Despite this room being in designer Ursula Mascaro's Spanish bungalow, I love the western look mixing bohemian and naturalistic accents. The simplicity, neutral colors and subtle patterned accents make this space feel relaxing, yet inspiring. Anyone else dying to spend some time in this room to decompress??

Get the look:


Hump Day Home Makeover / Nicole Gibbons Of So Haute

July 31, 2013


Nicole Gibbons from So Haute's living room caught my eye somewhere along my daily blog crawl. There are a lot of pieces in this room that I'm drawn to - the brass coffee table, Greek key trimmed curtains, Louis XVI chair, lucite chair and sun mirror to name a few. My roommate and I have been settling into our newly shared apartment and mixing some of the random decor pieces we have on hand to design our living room. Three of them where featured in Nicole's living room in a totally new style than we are working with and I loved the inspiration.

Here's how you can get the look:


6. Greek Key Curtains image (source) - DIY idea

Hump Day Home Makeover / Bedroom Decor

July 24, 2013

I have been having an insanely hard time trying to find the right bedding, curtains, and color scheme to go with my navy tufted headboard. I love the deep and moody velvet, but man is it hard to decide on the right pairing. Do I want to do boho and add some crazy patterns and pinks or neutrals and florals?? Seriously, you guys need to help me!

I'm currently thinking these ikat pillows could be the perfect fit. What do you think?


Some inspiration:

Hello Rachel Zane's Apartment / Hump Day Home Makeover

July 17, 2013

While most of America was anxiously watching to see where Rachel and Mike's relationship would stand after last season's steamy Suits season finale, I was shamelessly gawking over Rachel Zane's lovely apartment. Here is a "get the look" on her lovely apartment!


A great mix of traditional and modern pieces and pattern combos. Dark wood, cast iron windows and gold gilded framed Impressionist work. 
A+ to the set designers and writers! 
Anyone else tune into the season premier of Suits last night? 

What do you think of Rachel's place?

GET THE LOOK


Shop the Post:

Summer Cucumber Cocktail

July 03, 2013

Wednesdays around here usually mean Hump Day Home Makeover, where the day's post is dedicated to keeping you motivated and inspired to better your home space. But everyone once in a while a girl needs a break, am I right? This Wednesday, I'm ready to wind down for the long July 4th weekend and celebrate the holiday with this yummy cucumber summer cocktail recipe. 


This has become my new favorite drink  this summer. It's light, refreshing and a little bit sweet, which makes it perfect for hot summertime weather. Our favorite to date has been the Tommy Collins cocktail at The Mermaid Inn, which is what I based this recipe after. The q tonic is an important part of this drink recipe, since it uses agave as the sweetener instead of high fructose syrup like other tonics. And, it has 60% fewer calories than regular tonic! A good reason to make seconds rounds of this cocktail guilt free!

Ingredients
1.5 shots of gin (2 oz)
2.5 shots of q tonic (4 oz)
4-6 cucumber slices
1 lime slice
Ice

Rinse and shave skin off of cucumber, and slice into thin slices. Rinse and slice lime. 
In a glass, add half the cucumber slices, squeeze the lime wedge and add 1 shot of gin. Muddle the mixture with the back of your stirring spoon. Next, fill the glass with ice and add the remaining cucumber and gin and add tonic. 

What's your go-to summer cocktail?

hump day home makeover / beach decor ideas

June 26, 2013

With my mom spending her 50th summer and I my 26th, you can imagine why this is a place that we hold dear in our hearts. My mom's side of the family grew up coming to Pawleys Island every summer and staying in a wonderful, oceanfront bed and breakfast, Sea View Inn. I spent a few of my early summers at the Inn, and after visiting this past weekend I had to share its shabby chic design. Check out how to get the beach look for your home below!


Wood boards are everywhere in the Inns decor from painted ceilings to walls to floors. The back porch is one of my favorite rooms with it's white lofted ceiling and aqua floors. Isn't it fantastic?? 
Lime green and aqua are a match made in heaven.


This two pieced buffet is my next favorite decor piece in the Inn. The bright coral color is bright and cheery and makes a fun mix with the blue tiled counter. Here are some of my favorites of the living room and outdoor 


The whole Inn is charming and homey with bare feet guests, swinging Western doors, southern cooked meals, communal showers (and liquor cabinet),  and a nap/quiet hour from lunch to dinner.

Get the beach look for your home.

hump day home makeover / foo dog color bursts

June 05, 2013

I don't know when these little guys won me over, but somewhere along the way their ugly faces went from ugh to I. must. have. a. pair. It's like the pug dogs whose squishy wrinkly faces are so freaking cute.

In Asian culture, foo dogs represent the lion and can be found guarding imperial palaces, tombs, and government buildings. They are seen as protective statues and even thought to ward off evil spirits. I love the idea of an item with a meaning behind it. My last roommate left an evil eye charm hanging by our doorway that's believed to ward off envy or dislike, and I love seeing it everyday as a reminder to ward off negative feelings. If that's not for you, these little guys do a great job of adding a burst of color to your decor.


A FOO DOG FOR YOU


hump day home makeover / saavy small kitchens

May 29, 2013

As I get more and more into cooking, I've started thinking about ways to make my small kitchen more functional. Of course my first thought was to turn to Apartment Therapy, because clearly they will have some small kitchen ideas for me! Or not. Their "10 Favorite Small Kitchens" were huge! I would die for any of those kitchens. I mean come on!


And then I found "20 Small Kitchens with Style" and "10 Organized and Efficient Kitchen." Apartment Therapy, I knew I could rely on you. 


Some small kitchen space saver ideas I love:


So far, I'm only using a few of these space saving ideas and have a lot more way that I could maximize my space.


Shelves for plates, spices, etc. is a must in a small kitchen. I'd also go so far to say a kitchen cart or some kind of table dueling as an island is as well. If you don't have space for a table, these kitchen carts are great for storage and extra counter space. Plus, they role. I also really love my magnetic knife rack. I have limited counter space, so one of my main issues is being able to wash dishes and lay them to dry and still be able to use my kitchen. My knife rack duels as a knife holder and dry rack for my knives.

Mixing bowls are great to have and I love this stackable set. It saves space in your cabinets and is practical for cooking. This cookbook holder is my next pick, because 1. It's awesome! and 2. I'm really hoping it would work as an ipad holder too.

How do you save space in your small kitchen?

hump day home makeover / small closet ideas

May 22, 2013

Having a small closet can be tough. If you don't have the space to store all your clothes, accessories, etc. you can end up with a consistently messy closet and room. I've been wanting to get my closet in order and with the start of the spring season it feels like the perfect time.

At this point we know each other well enough for me to share this with you. Until the other day, this was the state of my current small closet. As you can see, I really wasn't maximizing any of my space or keep it organized. I was also trying to make lot of bootleg storage containers work some of which were left over boxes of items the girl who lived in the room before me used.


 Now, my closet looks like this after taking into account a few great tips for small closet storage.


1. The very first tip I suggest is that you use your closet for about a week or so to see how you are using it. For example, the containers the girl before me had must have worked great for her closet, but just didn't  work quite right for mine. In order to organize my closet, I thought about how I used my closet and what I wanted to get out of the storage.

2. First things first, your readily available clothes, shoes and accessories should be true to the season. Once the season changes, wash and pack away the previous season's garb for the next year to open up space in the active part of the closet. During this time I also look at what items I never wanted to wear that season and get them ready to be donated. This keeps the number of clothes down and also makes you feel better about ignoring that shirt the whole season.

3. Purchase matching hangers to allow for more space on the rack. I prefer the skinny white plastic hangers to maximize space.

4. Organize your closet by tops and dresses. This allows you to open up space below the shorter shirts' section.

4. Find a good shoe storage system. I picked up this 6 cubby shoe holder knowing I needed a place for my larger heels and tennis shoes. In addition to this, I have a hanging shoe rack that goes over the door, and store my boots in a repurposed brown box. I have yet to find a great idea for winter shoe storage and didn't want to invest in a holder for these shoes knowing it would get dirty. An upcycled box at the bottom of my closet felt like the perfect fit.

5. Next, store items at the top in the harder to reach areas that you won't need often. This is the perfect place for the down comforter or sweaters you won't need again until the weather gets cold. 

6. Lastly, I take this for granted in my closet, but if you don't have a shelf above your hanging rack...add on. That has been huge in creating space in my closet.

I also used some left over shoe boxes for extra storage and am still trying to make the stackable shelves I inherited work, but here's another look. 


I really love the look of the front open boxes from The Container Store, but am still trying to figure out what purpose they would serve for me. I'm thinking the could live under the shoe boxes and be the perfect holders for my clutches and belts.


What small closet ideas have you tried?

hump day home makeover / staining & sealing from apprentice extrovert

May 15, 2013

I first started Hump Day Home Makeover in 2012 when I was moving into a new apartment and needed inspiration for decorating my new place. I love eclectic décor, and think decorating is best when you collect pieces over a period of time rather than picking up everything at once. So, the idea around Hump Day Home Makeover was to keep my decorating momentum going and share home inspiration every Wednesday along with the pieces you need to make that look happen in your home.

This week’s Hump Day Home Makeover, features a DIY project from one of my favorite blogs, The Apprentice Extrovert. I’m not sure when or how I found Courtney’s blog, but it one of my daily reads thanks to its consistent flow of talented vintage furniture before and afters. Like me, Courtney has been in the process of revamping her home and has been sharing her progress along the way. Last week, she participated in my DIY miss to marvelous link up, and shared this awesome before and after of a provincial table. While it's clearly not a DIY miss, she learned a lot about how to stain and steel a dining room table correctly that will help other DIYers get it right in their first try.

Before:

After:

The finished product looks amazing, and she has some great tips for other DIYers looking to stain and seal a table correctly. Check it out on her blog here.

Want to be featured in next week's Hump Day Home Makeover? It's easy to link up...just write a post about your inspirations or project. You could be featured in next week's Hump Day Home Makeover!


hump day home makeover / diy miss to marvelous link up

May 08, 2013

Have you ever started a DIY project, gotten half way through and realized it wasn't going to work out the way you wanted? Or, even worse finished the project and hated it? As a serial DIY-er, I've had my fair share of projects gone wrong. And as a blogger, get even more bummed out when it doesn't turn out well and I have nothing to share with you all. Which made me think, why don't we share them? This week's Hump Day Home Makeover, I'm kicking off a new link up for those of you who want to join me in sharing DIY projects gone wrong & what you learned or gone wrong and turned right through a whole new idea. Link up here or scroll down!


For my latest DIY endeavor, I took a stab at adding wallpaper to cover the white tracks of my elfa shelves. It was a total miss. I think the pattern is wrong for the place. So here's what I did. I took my picture frame, the foam board used for the backing of the bookshelf and the decorative paper and turned them into a new tray for my bar. The green wood grain printed paper goes a lot better in this instance, and I love how the greens and pinks complement each other.


I have a new obsession with pink peonies. Here's the bouquet I put together, but I have no idea what the other flowers are. The man who owns the shop below my apartment talked me out of the flowers I wanted to buy and into these.


IKEA cabinet (dicontinued); similar | Mint Painting (homemade) | Pitcher (One Kings Lane); similar | Antler | Slate Bottle Tags | Picture Frame Used As Tray | Wine Glasses | Champagne Glasses | Rug

Have a DIY miss you made marvelous or a tip from a miss you want to share?! It's easy to link up...just write a post about your project with what you learned or how you made it right. You could be featured in next week's Hump Day Home Makeover!


Proudly designed by Mlekoshi playground