Chippendale Chair Redo Reveal

July 30, 2014


I'm excited to finally reveal the DIY Chippendale chair redo! If you've been following the story you know how long this project has been going on, so you can imagine how excited I am to have the finished product. I first picked these chairs up in November over Thanksgiving when I was visiting from New York. They were probably on my parent's neighbor's curb for less than 5 minutes on their way to the trash yard before I snatched them up and tucked them away in the garage. This gives you some background for the kind of condition the chairs were in. The black paint was chipping revealing multiple other layers of failed paint coats, there were cobwebs and bird droppings all over the chairs, and most obviously to note - they were missing seats. 


First things first, I pressure washed the chairs to remove a lot of the cobwebs, bird droppings and pollen and used a wire brush to pull off the paint. In some places, this revealed the original wicker. 


Once the chairs had dried, I used a white primer to help seal and cover the previous paint coats. From there I used a primer + paint spray paint in red, and applied about two coats letting them dry in-between each.


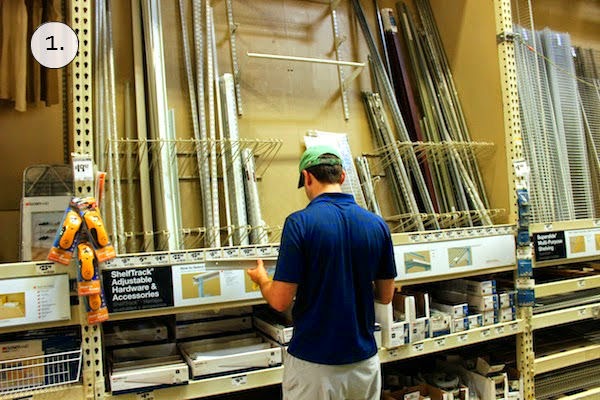
This is where the long stall came in this project. The next step was to build the seat and a wood cutter was going to be needed. This is where my strategic placement of these chairs in my parent's garage came in handy - leading to my dad to do the wood work. We measured the seats, cut the wood to the measurements, sanded the corners and screwed the seats into the frames.


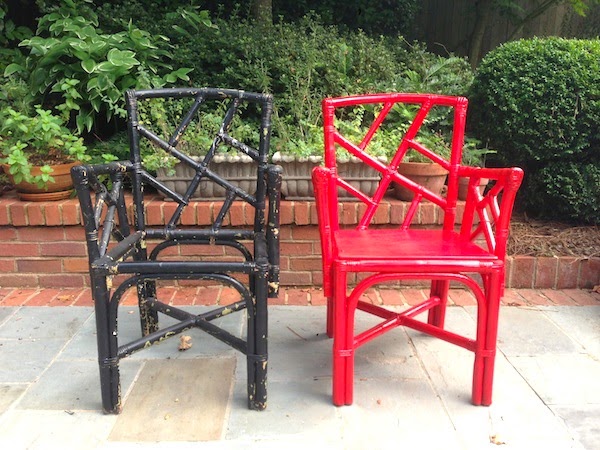
Another coat of paint (this would be the third one), and we had a pretty drastic before and after shot.

From the start, I had loved the bright apple red paint color and had been planning to pair it with a black Asian inspired print. This changed when I saw this fun pink and red bohemian pillow from Lulu & Georgia. I knew I had to have it. They only had one in stock, so the chairs turned towards statement chairs in different rooms instead of a pair. I put the bohemian print pillow with a standard white cushion that I got on clearance at World Cost Market for $14. The total cost of the chair redo was around $30! With Chippendale chairs retailing for as much as $700, I'd call this diy a success, and one that's easy to replicate. In this case, the structure of the chair is not extremely ornate, so the pop of red color helps make the chair look more chic and glamorous. This style of chair could easily be found at estate sales, garage sales and antique stores and redone to look brand new.


Watch The Process:

Or follow the process here:

What do you think of the finished look?

Because, Monday.

July 28, 2014

It's one of those Mondays. I'll be back tomorrow, but until then here are some home and fashion items I am loving. That watch looks nearly identical to an insanely expensive Cartier watch I love, but it's only $70! Steal, so I had to share. I'm heading to New York this weekend and couldn't be more excited. A chambray top, black skirt, white chucks and a medium sized purse are a must.


Inspiration Junky - Styling A Chic Crop Top

July 25, 2014

The chic crop top is quickly becoming one of my favorite trends. The look is fun and a nice alternative to cutouts. They can be styled a lot of different wants so there is a definite science to pulling it off just the right way so it looks chic and classy. The good news is this trend can work for everyone if you know the rules, and they are pretty simple.

left || right


Whether you pair a crop top with pants, a skirt or shorts make sure they are high-waisted so they will cover up your belly button. The crop top and bottoms should then work together so that only a sliver of skin is showing. The ideal sliver to show is right above your hip bones which tends to be the smallest part of a women's figure (think empire waists). Pulling together a crop top outfit? Try pairing a tight crop top with a flowy skirt and low ankle strapped heel for a chic look in black and whites or juxtaposed colors.


DIY Closet Shoe Storage

July 21, 2014


I am no Carrie Bradshaw when it comes to shoes. In fact, until this weekend I didn't even know I was really a shoe person. Sure I like shoes, but I am hard on my shoes and go for more affordable pairs making Sole Society and DSW some of my favorite stores. Over the past few years my shoe storage has been focused on space saving versus function - shoes piled into a dedicated laundry basket.


In New York, I could get away with an over the door shoe bag and laundry basket for the extras, but with a real sized closet I wanted a bit more structure. With it raining all weekend, it turned out to be the perfect time for this project. I headed over to the Container Store on Saturday with plans to use their Elfa system. 5 shelves later and that system would have cost me over $200. So we turned to The Home Depot to see if we could build a similar set up ourselves for a lower cost. We found the same kind of track system that the Container Store has and planned out our shelving unit for $100 less!

What's Needed
2 brackets for every shelf -We did the 11.5 inch brackets to support 12 inch shelves and got 10 for 5 shelves
5, 12 in x 36 in shelves - We choose the gray shelves since they were the same price as the white and won't shoe wear and tear as much.
Rubbermaid Hardware Pack -We needed two due to the size of our track
- Drill
- Drill Bits -1/8" drill bit and a Phillip Screwdriver bit
- Hammer
- Pencil
- Level

First things first, we measured the wall. which was 7"8' tall and 3"4' wide. We ended up choosing a system that was 2 ft. shorter than the wall and 4 inches smaller than the width of the wall. This meant a 70" tall track, which I really picked because if it was any taller I would need a stepping ladder to get to the shelves. The 3" shelves we're an eyeball guess that turned out well.


Once we had the materials, we measured out the track placements following the instructions on the shelf. For our shelves the tracks needed to be placed 16 inches apart. We then used a level to make sure we were lining the tracks up appropriately. Make sure you check the level on the top, but also parallel to each track.We measured the 16 inches from the top to the bottom and checked levels using a pen to make in each drill hole in the track.


The hardest part of this project were the dry wall anchors. This may be obvious to other people, but it took us a good 5 minutes or so to figure out how these things should work. Most anchors I've used before squeezed the other direction. For these, you take the points and squeeze them together in the direction the arrows in the below show.


To get these in the wall, we used a 1/8" drill bit. The you kind of have to wiggle the anchor into the hole and hammer. Once the anchor is in the wall, you use the black piece in the above picture to expand the anchor out so it holds. We then halfway screwed in the 4 points we choose to secure (they were about 7-8 holes, but we didn't feel we needed to secure all - we're apartment dwellers after all).


After the tracks are up you hang you brackets so that two brackets support each shelf. I left 8 notches in between my shelves, but this is customizable.


And here is the after shot once all the shelves were hung and all my shoes we set up. The closet is pretty tight, so getting a good shot was a bit tough. The great thing about this system versus the Container Store besides the price is that these shelves could be used for storage besides shoes depending on your preference where the angled shoe shelves really lead themselves to shoes.


I can't even say how happy I am with the outcome, who knew a girl could love a shoe wall so much. Not only do I love the organization of this, but it also gives me a good overall look at the shoes I have. As you can see, when it comes to colorful shoes I go for red heels. Otherwise, nude and black shoes are a must for work.


Shop My Shoes:

Fashion Fridays - Neon + Bold Prints

July 18, 2014


I saw these neon yellow shoes this week and knew I had to include them in a post this week. Freckles and yellow can be a hard combination, so keeping the bright yellow color as far away from my freckled complexion is a must. These shoes are so much fun for summer and could totally be paired with bold colors and prints. Since today is also the start of Nordstrom's Anniversary Sale, I had to include some of my favorites from there as well. Shop my all of my Nordstrom picks here.

This weekend, CT and I have a ton of projects on the docket it's going to be hard to decide which one to do. Fingers crossed my closet project wins out. 

Shoes on Shoes on Shoes - Creating Your Dream Closet

July 16, 2014

If you had asked me which celebrity closest I would want, I would not have guessed Ashley Tisdale's. And while that still holds true from what's in the closet (Olivia Palermo's please), I am definitely coveting her amazing set up and space. I mean check out that shoe wall!
InStyle

Designer, Lynn Nigro's, Parisian styled closet would have been a better guess, but any chance of me picking her out of the crowd would be slim. More envious shoe racks and this time glamorous see-through drawers.


Being that it's Hump Day, which on Decor-Eat means it's the day of the week dedicated to home makeovers (as if I don't dedicate every other day of the week to dreaming about decorating my apartment), this Hump Day Home Makeover, I'm planning a weekend project for CT and I. It's one of the few we will have in town for the next month (phew - travel posts are in our future), so of course I'm already in overdrive planning which home decor projects to tackle. I have planted the bug that a trip to the Container Store is needed, and have been accidentally and as it turns out strategically leaving my shoes in the kitchen or in a messy pile in my room catching CT's type A personality's attention. Ultimately making him the perfect partner in crime for the weekend project. I want and need a shoe rack, and need more shelving for folded clothes and purses.

The Coveteur
Here are some pieces I think help make the perfect organized dream closet.

Chippendale Chair Redo - Update

July 15, 2014

You guys remember that DIY project I was working on earlier this spring of redoing some Chinnoisserie chairs I found on the side of the road? Well, I’m back from my radio silence on this project, and some progress to share from the weekend. Although I can’t really take credit for the updates. 

If you're new to Decor-Eat, first of all welcome! For some background, here is where the chairs started - black with chipped paint, no seats and in desperate need of a cleaning and redo!


The end-goal is some variation of these chairs except for our balcony.


Those of you who have tried a DIY project know how hard it can be to find the time for crafting – add in a project that require wood cutting and it gets even more difficult for those of us in apartments. Being in Atlanta, I’m lucky to have my parents nearby with a backyard and most importantly a garage that they begrudgingly let me store my in-progress projects in. So these lovely chippendale chairs have been living stacked up in front of my Dad’s parking spot in the garage, and this weekend I reaped the benefits. I went over to my parent’s house to find my Dad in the garage, in front of the wood bench with the wood cutter in hand. 

First things first, we measured the chair in the back and front of where we wanted the seat to go. This ended up being 16" 3/4 in the back and 17" in the front.


And then we measured this out on the plywood. To make sure we got the angle right we checked the halfway point of each measure and made sure they were equidistant from each side line. A 90 degree angled ruler was helpful to make sure we drew a straight line.


We then used an electric circular saw, and by we I mean my Dad, not sure I'm ready to mess with that one. Evidently they can have a pretty strong kick back. Goggles and headphones were a must. We also used a clamp to help hold the board in place and pushed it up against some placeholders on the right side to get a precise cut.

Luckily, the board was a perfect fit for the the seat. If you notice, the corners and edges of the board are sharp in this picture, so we used an ocillating sander to help round them out.


I'm not going to lie, I got pretty excited about this tool. Wood cutting is something I will definitely work my way up to, but this sander is something I want to start using now. I hate to sand. This tool moves the sandpaper in a circle making the sanding even and SO much faster.


The before is on the left and sanded on the right.

Looks so much better, right? 
We cut the first seat and called it a day.


Sunday rolls around and I get a text from my Dad updating me that the seat has been screwed in and painted! Best Dad ever right? And I think there is a ring to that. New series? DIY with Daddo.

Antiquing in Atlanta - Scott Antique Market

July 14, 2014

Two huge warehouses with over 2,000 antique vendors,  I call it the perfect Sunday. 


Scott Antique Market is an antique show that comes to Atlanta the second weekend of every month from Thursday to Sunday. Since I've been back in Atlanta, the second weekend of the month just hasn't worked out for a trip to Scotts until this weekend. I went to Scotts about 4 years ago, and I will admit I was a decor and antique show rookie. I walked into it thinking there would be tons of cheap furniture to purchase and DIY. I was way off. 

Since starting Decor-Eat, I'd like to say I'm a little less naive. I know how much an antique rug should cost, what's a bargain, what's not, and what a "dealer" discount is although I still showed up to the show without thinking to bring cash. Definitely a rookie mistake, but I'll cut myself some slack since this was only my second rodeo here. We spent the day browsing around the expos looking for french chairs for the living room, and just didn't quite find the right pair - we found one with a misfit pillow...


and one with the wrong arm and leg finish plus a need for re-upholstery...


unless you count the one that was already sold.


We ended up liking a style a bit different than the Louis XVI style we went for, but went home empty handed.


My favorite from the trip were these awesome "banana chairs." I love the chair frame detail, black and white striped fabric and floral pillow. My picture came out blurry, so this one from The Upholstery Fashionista's FB page


Awesome, right?

Here are some of my other favorites from this weekend:


Outside of Scott Antique Market, there was also a great tent in-between the North and South expos with a lot of french furniture from dining room chair sets to living room chairs to hutches and secretaries. 


I thought this secretary was really awesome because the support beams came out automatically when you opened the drawer.


Hope you all had a great weekend!

Proudly designed by Mlekoshi playground