Showing posts with label diy. Show all posts

Pumpkins on Pumpkins on Pumpkins

October 30, 2014

There have been some pretty amazingly creative pumpkin carving and no-carve decorative ideas going around this year that I had to share. Pumpkins are looking very spooky chic this season. I am obsessed with this constellation pumpkin idea. I hadn't thought about using a drill to make small holes for patterned decorations before.A new trick of the trade to try this year.

We're going to be carving pumpkins tonight -so check out our end product on Instagram @decoreat.
Happy Halloween Everyone!


Chippendale Chair Redo Reveal

July 30, 2014


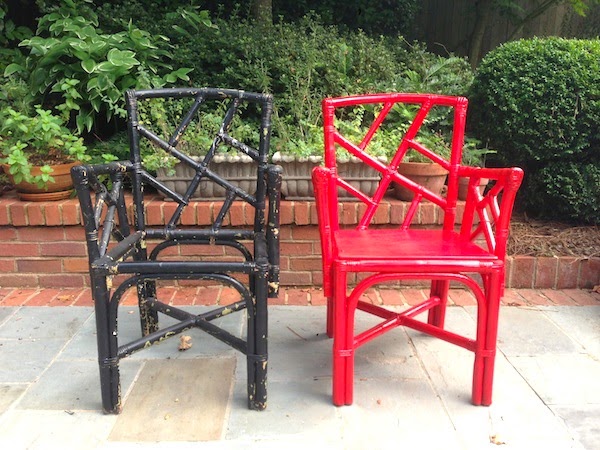
I'm excited to finally reveal the DIY Chippendale chair redo! If you've been following the story you know how long this project has been going on, so you can imagine how excited I am to have the finished product. I first picked these chairs up in November over Thanksgiving when I was visiting from New York. They were probably on my parent's neighbor's curb for less than 5 minutes on their way to the trash yard before I snatched them up and tucked them away in the garage. This gives you some background for the kind of condition the chairs were in. The black paint was chipping revealing multiple other layers of failed paint coats, there were cobwebs and bird droppings all over the chairs, and most obviously to note - they were missing seats. 


First things first, I pressure washed the chairs to remove a lot of the cobwebs, bird droppings and pollen and used a wire brush to pull off the paint. In some places, this revealed the original wicker. 


Once the chairs had dried, I used a white primer to help seal and cover the previous paint coats. From there I used a primer + paint spray paint in red, and applied about two coats letting them dry in-between each.


This is where the long stall came in this project. The next step was to build the seat and a wood cutter was going to be needed. This is where my strategic placement of these chairs in my parent's garage came in handy - leading to my dad to do the wood work. We measured the seats, cut the wood to the measurements, sanded the corners and screwed the seats into the frames.


Another coat of paint (this would be the third one), and we had a pretty drastic before and after shot.

From the start, I had loved the bright apple red paint color and had been planning to pair it with a black Asian inspired print. This changed when I saw this fun pink and red bohemian pillow from Lulu & Georgia. I knew I had to have it. They only had one in stock, so the chairs turned towards statement chairs in different rooms instead of a pair. I put the bohemian print pillow with a standard white cushion that I got on clearance at World Cost Market for $14. The total cost of the chair redo was around $30! With Chippendale chairs retailing for as much as $700, I'd call this diy a success, and one that's easy to replicate. In this case, the structure of the chair is not extremely ornate, so the pop of red color helps make the chair look more chic and glamorous. This style of chair could easily be found at estate sales, garage sales and antique stores and redone to look brand new.


Watch The Process:

Or follow the process here:

What do you think of the finished look?

Chippendale Chair Redo - Update

July 15, 2014

You guys remember that DIY project I was working on earlier this spring of redoing some Chinnoisserie chairs I found on the side of the road? Well, I’m back from my radio silence on this project, and some progress to share from the weekend. Although I can’t really take credit for the updates. 

If you're new to Decor-Eat, first of all welcome! For some background, here is where the chairs started - black with chipped paint, no seats and in desperate need of a cleaning and redo!


The end-goal is some variation of these chairs except for our balcony.


Those of you who have tried a DIY project know how hard it can be to find the time for crafting – add in a project that require wood cutting and it gets even more difficult for those of us in apartments. Being in Atlanta, I’m lucky to have my parents nearby with a backyard and most importantly a garage that they begrudgingly let me store my in-progress projects in. So these lovely chippendale chairs have been living stacked up in front of my Dad’s parking spot in the garage, and this weekend I reaped the benefits. I went over to my parent’s house to find my Dad in the garage, in front of the wood bench with the wood cutter in hand. 

First things first, we measured the chair in the back and front of where we wanted the seat to go. This ended up being 16" 3/4 in the back and 17" in the front.


And then we measured this out on the plywood. To make sure we got the angle right we checked the halfway point of each measure and made sure they were equidistant from each side line. A 90 degree angled ruler was helpful to make sure we drew a straight line.


We then used an electric circular saw, and by we I mean my Dad, not sure I'm ready to mess with that one. Evidently they can have a pretty strong kick back. Goggles and headphones were a must. We also used a clamp to help hold the board in place and pushed it up against some placeholders on the right side to get a precise cut.

Luckily, the board was a perfect fit for the the seat. If you notice, the corners and edges of the board are sharp in this picture, so we used an ocillating sander to help round them out.


I'm not going to lie, I got pretty excited about this tool. Wood cutting is something I will definitely work my way up to, but this sander is something I want to start using now. I hate to sand. This tool moves the sandpaper in a circle making the sanding even and SO much faster.


The before is on the left and sanded on the right.

Looks so much better, right? 
We cut the first seat and called it a day.


Sunday rolls around and I get a text from my Dad updating me that the seat has been screwed in and painted! Best Dad ever right? And I think there is a ring to that. New series? DIY with Daddo.

IKEA Hack Gold Etagere

May 21, 2014


Happy Hump Day Everyone! In honor of hump day, I'm sharing my latest DIY project. It's one of my favorite kinds, an IKEA hack.


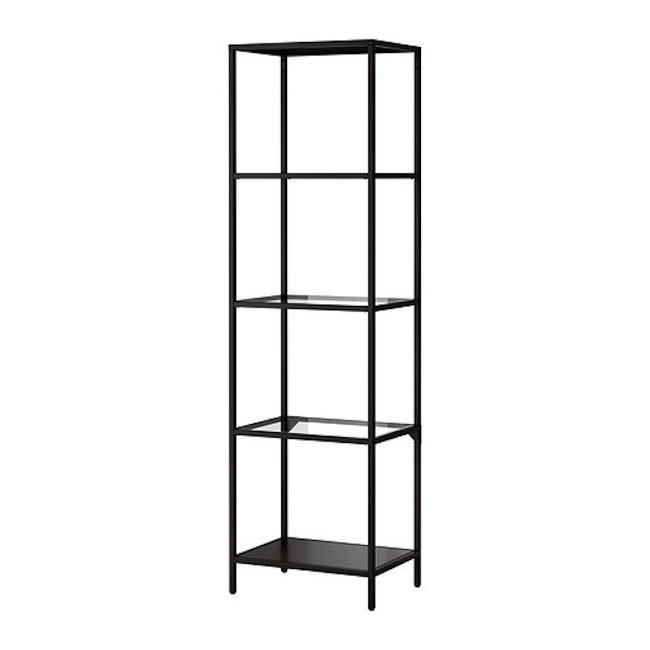
Every now and then a piece of IKEA furniture really blows up among the DIY community. Last it was the RAST dresser, and now the VITTSJO series. The series offers a lot of great pieces to redo from coffee tables to shelving units. I picked the single shelf to redo for our living room since it's the perfect size for the wall next to the couch.

This do-it-yourself project is really simple, and just requires some time and patience. 

Here's what you'll need:
Cost around $25
paint
And the VITTSJO shelf from IKEA 
Cost - $40
vittsjo-shelving-unit__0135351_PE292042_S4
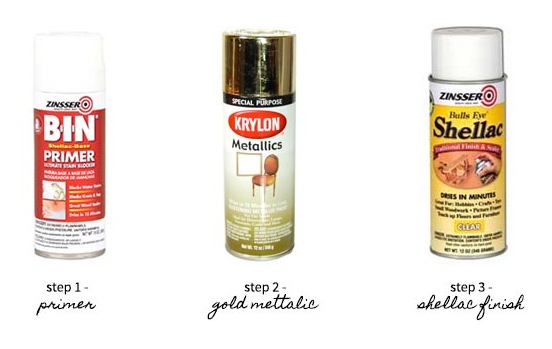
The first step is to prime all of the pieces.


Next, spray each piece with the metallic gold spray from every angle and allow to dry. I did about 2 coats with just the one can. I used a painter's mat and wore a face mask to make sure I didn't get any spray paint on the ground and didn't inhale the fumes. You can also wear protective eye wear.


 Once dry, you will need to assemble the piece following the instructions and spray the heads of the black screws that show. Once all pieces are gold, spray all of them with the shellac finish, and let dry.

Here's the color and texture up close.

That's it! The hardest part for me was really just finding the time between a new job and new home to get outside and spray the pieces through all the steps. I love the end product and it fits perfectly in our new space. I decorated the shelves with items we already had and a few birthday presents (see pig and hostess book). I love the look of this kind of shelf with a lot of magazines or books, so I'll be collecting those of the next few months to add to it.


In other news, our building took the sign down from our window and we now have an amazing view of the city!


Pattern Picking - Chinoiserie Chair DIY

April 11, 2014

It has been a lot of fun being in Atlanta this week during my off time between jobs. I am apartment hunting and day dreaming about decorating our apartment. Meanwhile, I finally got the chance to start my Chippendale chair redo I keep talking about, and I am going to need y'alls help picking fabrics! This picture has stuck in my head, and I ended up picking up red spray paint at Home Depot instead of a bright orange. I just love the glam bright red pop of color and how it mixes with a black background chinoiserie fabric.


So, far I have one coat of paint on the chair, and man they weren't kidding when they said rattan absorbs color. I'm guessing I'll need four cans to paint both chairs. Already, I am loving the color and can't wait for the finished product! 


Picking out just the right fabric is proving to be the hardest part, although ask me again once I've installed the seat...not sure where to start with that one since they didn't come with a seat board to reupholster. Here are some of the fabrics I'm trying to decide between. Let me know what you think!

Hump Day Home Makeover - DIY Faux Malachite

February 13, 2014

Well it's not quite technically still Hump Day Home Makeover (thanks to the slowness of my WiFi), but I'm gonna run with it...While most people watched and tweeted about how boring the Superbowl was the other weekend …I tackled a new DIY project. 

As I’ve said before DIYing in the city can really be exhausting. Hopping from the East Village to Midtown to LES and back over to Flatiron to pick up supplies, and makeshift supplies at that. In a city that has everything, the lack of craft stores really says it all. New Yorkers don’t craft. I mean after endless marathons of Friends and SATC was anyone every crafting??  Turns out the consistent snow storms have brought the DIYer in me back out. And what better way to easily get my DIY fix than to makeover an existing piece of furniture, my kitchen table. 

I read around different blogs for tips on how to tackle this technique and picked out my supplies - a hand sander, Benjamin Moore Advance paint in an aqua color (Misty Green), polycrylic protective finish in clear, teal, green and black acrylic paints, paint jars, a medium sized brush and two different sizes of fan brushes. First things first, I cleaned the table, lightly sanded it and applied the misty green paint. I let it dry for a few hours and applied 2 coats.
Once it was dry, I mixed a dark green color by combining the green, black and polycrylic together, and another for the teal + polycrylic. To create the malachite look, I alternated between both colors and different sizes of the fan brush creating swiggly circles in loops. It actually was harder for me to get a handle on the technique than I thought, but I think the best piece of advice was to keep your wrist lose and the paint wet so you can adjust swiggles and colors as needed. I started on one side of the table going from top to bottom.
The fan brushes with the dark green and teal colors made a nice pattern over the misty green letting it show through in the design. This really gave the design depth making it look more like the real deal.
In the end, I really love the table and the idea of making it more of a desk and recipe browsing station in the kitchen. 

Your Trash Is My Treasure // Chippendale Chairs

November 26, 2013

Wow, it is amazing how much easier DIY is in Atlanta than New York. You find a cool piece of furniture on the side of the road? You pick it up...and put it in your car. You don't lug it two avenues and ten blocks and then up your four flights of stairs. Atlanta, you're on to something...

I was lucky enough to be able to fly home early for Thanksgiving this weekend and found these Chinoisserie/Chippendale chairs out on the curb. When new (and I will admit, more intricate) Chippendale chairs cost as much as $600, I was thrilled to find these for free! They have clearly been sitting outside and need some cleaning and TLC, but a bath, a new paint coat and seat cushions, and they'll look brand new! 


I'm trying to decide how to redo the chairs and would love some help. I'm somewhere between a statement color for the frame and pattern play for the cushion or white and neutral with a pillow to make it versatile.

What do you think?


images via:
1
2 // 3
4 // 5
6
7
Proudly designed by Mlekoshi playground